8 общих структур данных в Javascript

Возможно, вы хотите улучшить свои фундаментальные знания в области компьютерных наук, особенно в области структуры данных и алгоритмов. Сегодня мы рассмотрим некоторые общие структуры данных и реализуем их в JavaScript.
Надеюсь, эта часть дополнит ваши навыки!
1. Стек
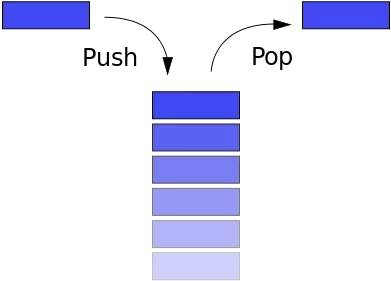
Стек следует принципу LIFO (Last In First Out). Если вы складываете книги, верхняя книга берется перед нижней. Или, когда вы просматриваете Интернет, кнопка «Назад» ведет к последней просмотренной странице.
Стек имеет следующие распространенные методы:
push: введите новый элементpop: удалить верхний элемент, вернуть удаленный элементpeek: вернуть верхний элементlength: вернуть количество элементов в стеке
Массив в Javascript имеет атрибуты стека, но мы создаем стек с нуля, используя function Stack()
function Stack () {
this.count = 0;
  this.storage = {};

  this.push = function (value) {
    this.storage [this.count] = value;
    this.count ++;
  }

  this.pop = function () {
    if (this.count === 0) {
      return undefined;
    }
    this.count--;
    var result = this.storage [this.count];
    удалить this.storage [this.count];
    вернуть результат;
  }

  this.peek = function () {
    return this.storage [this.count - 1];
  }

  this.size = function () {
    return this.count;
  }
}
2. Очередь
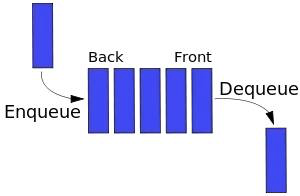
Очередь похожа на стек. Единственное отличие состоит в том, что в очереди используется принцип FIFO («первым вошел - первым вышел»). Другими словами, когда вы стоите в очередь на автобус, первый в очереди всегда будет первым.
В очереди есть следующие методы:
enqueue: введите очередь, добавьте элемент в концеdequeue: покинуть очередь, убрать передний элемент и вернуть егоfront: получить первый элементisEmpty: определить, пуста ли очередьsize: получить количество элементов в очереди
Массив в JavaScript имеет некоторые атрибуты очереди, поэтому мы можем использовать массив для построения примера для очереди:
function Queue () {
  var collection = [];
  this.print = function () {
    console.log (collection);
  }
  this.enqueue = function (element) {
    collection.push (element);
  }
  this.dequeue = function () {
    return collection.shift ();
  }
  this.front = function () {
    return collection [0];
  }

  this.isEmpty = function () {
    return collection.length === 0;
  }
  this.size = function () {
    return collection.length;
  }
}
Очередь с приоритетом
В очереди есть еще одна продвинутая версия. Выделите каждый элемент с приоритетом, и он будет отсортирован в соответствии с уровнем приоритета:
function PriorityQueue() {

  ...

  this.enqueue = function (element) {
    if (this.isEmpty()) {
      collection.push(element);
    } else {
      var added = false;
      for (var i = 0; i < collection.length; i++) {
        if (element[1] < collection[i][1]) {
          collection.splice(i, 0, element);
          added = true;
          break;
        }
      }
      if (!added) {
        collection.push(element);
      }
    }
  }
}
Тестируем:
var pQ = new PriorityQueue();
pQ.enqueue([ gannicus , 3]);
pQ.enqueue([ spartacus , 1]);
pQ.enqueue([ crixus , 2]);
pQ.enqueue([ oenomaus , 4]);
pQ.print();
Результат:
[
  [  spartacus , 1 ],
  [  crixus , 2 ],
  [  gannicus , 3 ],
  [  oenomaus , 4 ]
]
3. Связанный список
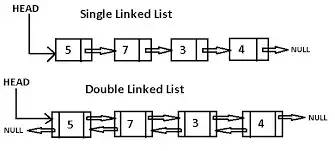
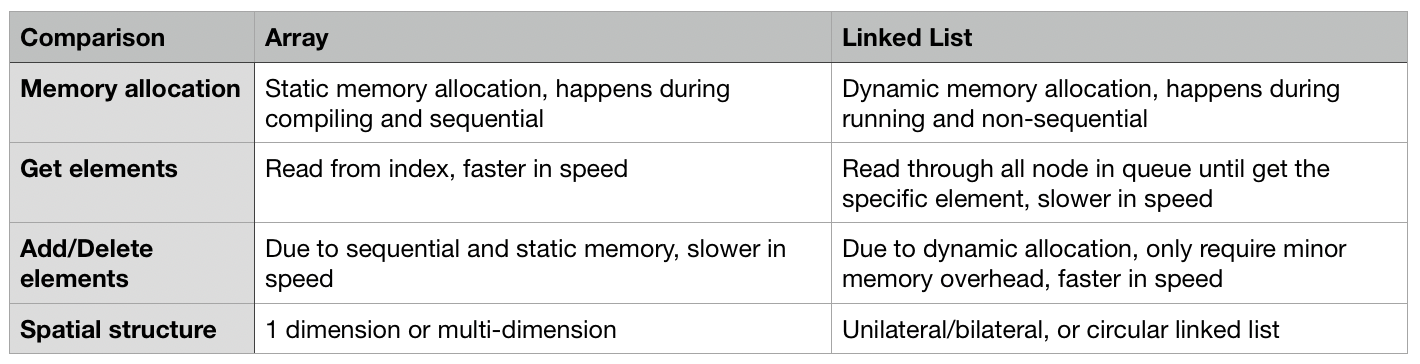
Связанный список буквально представляет собой цепочечную структуру данных, где каждый узел состоит из двух частей информации: данных узла и указателя на следующий узел. Связанный список и обычный массив являются линейными структурами данных с сериализованным хранилищем. Конечно, они также имеют различия:
Односторонний связанный список обычно имеет следующие методы:
size: Вернуть номер узла (ов)head: Вернуть элемент головыadd: Добавить еще один узел в хвостremove: Удалить определенный узелindexOf: Вернуть индекс узлаelementAt: Вернуть узел индексаaddAt: Вставить узел по определенному индексуremoveAt: Удалить узел по определенному индексу
/** Node in the linked list **/
function Node(element) {
    // Data in the node
    this.element = element;
    // Pointer to the next node
    this.next = null;
}
    function LinkedList() {
        var length = 0;
        var head = null;
        this.size = function () {
            return length;
        }
        this.head = function () {
            return head;
        }
        this.add = function (element) {
            var node = new Node(element);
            if (head == null) {
                head = node;
            } else {
                var currentNode = head;
                while (currentNode.next) {
                    currentNode = currentNode.next;
                }
                currentNode.next = node;
            }
            length++;
        }
        this.remove = function (element) {
            var currentNode = head;
            var previousNode;
            if (currentNode.element === element) {
                head = currentNode.next;
            } else {
                while (currentNode.element !== element) {
                    previousNode = currentNode;
                    currentNode = currentNode.next;
                }
                previousNode.next = currentNode.next;
            }
            length--;
        }
        this.isEmpty = function () {
            return length === 0;
        }
        this.indexOf = function (element) {
            var currentNode = head;
            var index = -1;
            while (currentNode) {
                index++;
                if (currentNode.element === element) {
                    return index;
                }
                currentNode = currentNode.next;
            }
            return -1;
        }
        this.elementAt = function (index) {
            var currentNode = head;
            var count = 0;
            while (count < index) {
                count++;
                currentNode = currentNode.next;
            }
            return currentNode.element;
        }
        this.addAt = function (index, element) {
            var node = new Node(element);
            var currentNode = head;
            var previousNode;
            var currentIndex = 0;
            if (index > length) {
                return false;
            }
            if (index === 0) {
                node.next = currentNode;
                head = node;
            } else {
                while (currentIndex < index) {
                    currentIndex++;
                    previousNode = currentNode;
                    currentNode = currentNode.next;
                }
                node.next = currentNode;
                previousNode.next = node;
            }
            length++;
        }
        this.removeAt = function (index) {
            var currentNode = head;
            var previousNode;
            var currentIndex = 0;
            if (index < 0 || index >= length) {
                return null;
            }
            if (index === 0) {
                head = currentIndex.next;
            } else {
                while (currentIndex < index) {
                    currentIndex++;
                    previousNode = currentNode;
                    currentNode = currentNode.next;
                }
                previousNode.next = currentNode.next;
            }
            length--;
            return currentNode.element;
        }
    }
4. Set
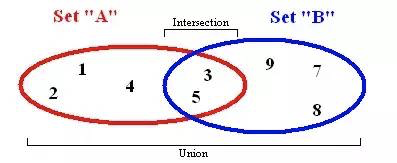
Набор является основным понятием в математике: набор четко определенных и отличных объектов. ES6 ввел понятие множества, которое имеет определенный уровень сходства с массивом. Однако набор не позволяет повторять элементы и не индексируется.
Типичный набор имеет следующие методы:
values: Вернуть все элементы в набореsize: Вернуть количество элементовhas: Определить, существует ли элементadd: Вставить элементы в наборremove: Удалить элементы из набораunion: Вернуть пересечение двух множествdifference: Вернуть разницу двух комплектовsubset: Определить, является ли определенный набор подмножеством другого набора
Чтобы дифференцировать set в ES6, мы объявляем как MySet в следующем примере:
function MySet() {
    var collection = [];
    this.has = function (element) {
        return (collection.indexOf(element) !== -1);
    }
    this.values = function () {
        return collection;
    }
    this.size = function () {
        return collection.length;
    }
    this.add = function (element) {
        if (!this.has(element)) {
            collection.push(element);
            return true;
        }
        return false;
    }
    this.remove = function (element) {
        if (this.has(element)) {
            index = collection.indexOf(element);
            collection.splice(index, 1);
            return true;
        }
        return false;
    }
    this.union = function (otherSet) {
        var unionSet = new MySet();
        var firstSet = this.values();
        var secondSet = otherSet.values();
        firstSet.forEach(function (e) {
            unionSet.add(e);
        });
        secondSet.forEach(function (e) {
            unionSet.add(e);
        });
        return unionSet;  }
        this.intersection = function (otherSet) {
            var intersectionSet = new MySet();
            var firstSet = this.values();
            firstSet.forEach(function (e) {
                if (otherSet.has(e)) {
                    intersectionSet.add(e);
                }
            });
            return intersectionSet;
        }
        this.difference = function (otherSet) {
            var differenceSet = new MySet();
            var firstSet = this.values();
            firstSet.forEach(function (e) {
                if (!otherSet.has(e)) {
                    differenceSet.add(e);
                }
            });
            return differenceSet;
        }
        this.subset = function (otherSet) {
            var firstSet = this.values();
            return firstSet.every(function (value) {
                return otherSet.has(value);
            });
        }
    }
5. Хеш-таблица
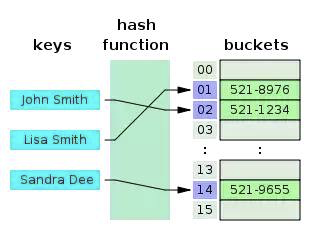
Хеш-таблица - это структура данных ключ-значение. Из-за молниеносной скорости запроса значения через ключ оно обычно используется в структурах данных Map, Dictionary или Object. Как показано на приведенном выше графике, в хэш-таблице используется hash function для преобразования ключей в список чисел, и эти числа служат значениями соответствующих ключей. Чтобы получить значение с помощью ключа невероятно быстро, временная сложность может достичь O(1). Одни и те же ключи должны возвращать одинаковые значения - это основа хеш-функции.
Хеш-таблица имеет следующие методы:
add: Добавить пару ключ-значениеremove: Удалить пару ключ-значениеlookup: Найти соответствующее значение с помощью ключа
Пример упрощенной хеш-таблицы в Javascript:
function hash(string, max) {
  var hash = 0;
  for (var i = 0; i < string.length; i++) {
    hash += string.charCodeAt(i);
  }
  return hash % max;
}

function HashTable() {
  let storage = [];
  const storageLimit = 4;

  this.add = function (key, value) {
    var index = hash(key, storageLimit);
    if (storage[index] === undefined) {
      storage[index] = [
        [key, value]
      ];
    } else {
      var inserted = false;
      for (var i = 0; i < storage[index].length; i++) {
        if (storage[index][i][0] === key) {
          storage[index][i][1] = value;
          inserted = true;
        }
      }
      if (inserted === false) {
        storage[index].push([key, value]);
      }
    }
  }

  this.remove = function (key) {
    var index = hash(key, storageLimit);
    if (storage[index].length === 1 && storage[index][0][0] === key) {
      delete storage[index];
    } else {
      for (var i = 0; i < storage[index]; i++) {
        if (storage[index][i][0] === key) {
          delete storage[index][i];
        }
      }
    }
  }

  this.lookup = function (key) {
    var index = hash(key, storageLimit);
    if (storage[index] === undefined) {
      return undefined;
    } else {
      for (var i = 0; i < storage[index].length; i++) {
        if (storage[index][i][0] === key) {
          return storage[index][i][1];
        }
      }
    }
  }
}
6. Дерево
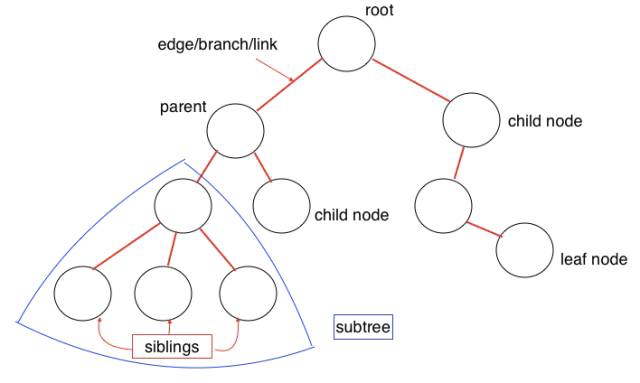
Древовидная структура данных является многослойной структурой. Это также нелинейная структура данных по сравнению с массивом, стеком и очередью. Эта структура очень эффективна во время операций вставки и поиска. Давайте посмотрим на некоторые концепции древовидной структуры данных:
root: Корневой узел дерева, нет родительского узла для корняparent node: Прямой узел верхнего слоя, только одинchild node: Прямой узел (узлы) нижнего уровня, может иметь несколькоsiblings: Общий родительский узелleaf: Узел без потомкаEdge: Ветвь или связь между узламиPath: Ребра от начального узла до целевого узлаHeight of Node: Число ребер самого длинного пути конкретного узла к конечному узлуHeight of Tree: Число ребер самого длинного пути корневого узла к листовому узлуDepth of Node: Количество ребер от корневого узла до определенного узлаDegree of Node: Количество дочерних узлов
Вот пример бинарного дерева поиска. Каждый узел имеет максимум два узла, причем левый узел меньше текущего узла, а правый узел больше текущего узла:
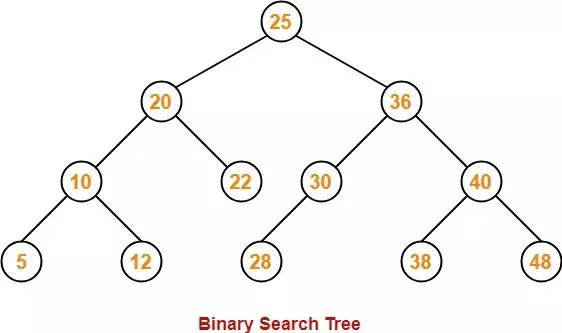
Общие методы в бинарном дереве поиска:
add: Вставить узел в деревоfindMin: Получить минимальный узелfindMax: Получить максимальный узелfind: Поиск определенного узлаisPresent: Определить существование определенного узлаremove: Удалить узел из дерева
Пример в JavaScript:
class Node {
  constructor(data, left = null, right = null) {
    this.data = data;
    this.left = left;
    this.right = right;
  }
}

class BST {
  constructor() {
    this.root = null;
  }

  add(data) {
    const node = this.root;
    if (node === null) {
      this.root = new Node(data);
      return;
    } else {
      const searchTree = function (node) {
        if (data < node.data) {
          if (node.left === null) {
            node.left = new Node(data);
            return;
          } else if (node.left !== null) {
            return searchTree(node.left);
          }
        } else if (data > node.data) {
          if (node.right === null) {
            node.right = new Node(data);
            return;
          } else if (node.right !== null) {
            return searchTree(node.right);
          }
        } else {
          return null;
        }
      };
      return searchTree(node);
    }
  }

  findMin() {
    let current = this.root;
    while (current.left !== null) {
      current = current.left;
    }
    return current.data;
  }

  findMax() {
    let current = this.root;
    while (current.right !== null) {
      current = current.right;
    }
    return current.data;
  }

  find(data) {
    let current = this.root;
    while (current.data !== data) {
      if (data < current.data) {
        current = current.left
      } else {
        current = current.right;
      }
      if (current === null) {
        return null;
      }
    }
    return current;
  }

  isPresent(data) {
    let current = this.root;
    while (current) {
      if (data === current.data) {
        return true;
      }
      if (data < current.data) {
        current = current.left;
      } else {
        current = current.right;
      }
    }
    return false;
  }

  remove(data) {
    const removeNode = function (node, data) {
      if (node == null) {
        return null;
      }
      if (data == node.data) {
        // no child node
        if (node.left == null && node.right == null) {
          return null;
        }
        // no left node
        if (node.left == null) {
          return node.right;
        }
        // no right node
        if (node.right == null) {
          return node.left;
        }
        // has 2 child nodes
        var tempNode = node.right;
        while (tempNode.left !== null) {
          tempNode = tempNode.left;
        }
        node.data = tempNode.data;
        node.right = removeNode(node.right, tempNode.data);
        return node;
      } else if (data < node.data) {
        node.left = removeNode(node.left, data);
        return node;
      } else {
        node.right = removeNode(node.right, data);
        return node;
      }
    }
    this.root = removeNode(this.root, data);
  }
}
Тестируем:
const bst = new BST();
bst.add(4);
bst.add(2);
bst.add(6);
bst.add(1);
bst.add(3);
bst.add(5);
bst.add(7);
bst.remove(4);
console.log(bst.findMin());
console.log(bst.findMax());
bst.remove(7);
console.log(bst.findMax());
console.log(bst.isPresent(4));
Результат:
1
7
6
false
7. Trie (произносится “try”)
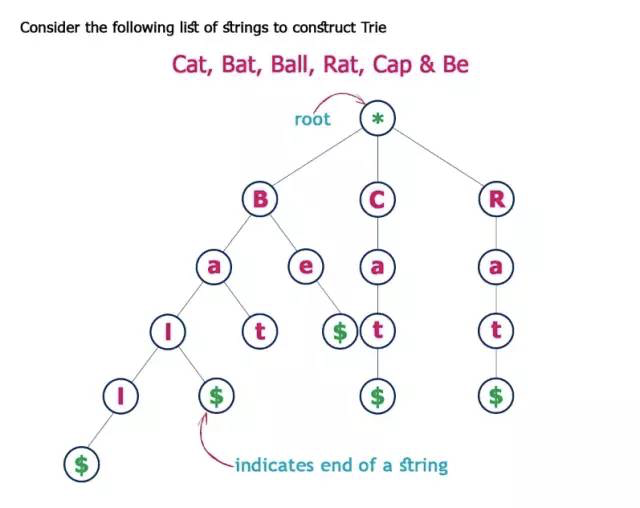
Trie, или «дерево префиксов», также является типом дерева поиска. Trie хранит данные пошагово - каждый узел в дереве представляет шаг. Trie используется для хранения словаря, поэтому его можно быстро найти, особенно для функции автозаполнения.
Каждый узел в Trie имеет алфавит - следующая ветвь может образовывать целое слово. Он также содержит логический индикатор, чтобы показать, является ли это последний алфавит.
Три имеет следующие методы:
add: Вставить слово в дерево словаряisWord: Определить, состоит ли дерево из определенного словаprint: Вернуть все слова в дереве
/** Node in Trie **/
function Node() {
    this.keys = new Map();
    this.end = false;
    this.setEnd = function () {
        this.end = true;
    };
    this.isEnd = function () {
        return this.end;
    }
}

function Trie() {
        this.root = new Node();
        this.add = function (input, node = this.root) {
            if (input.length === 0) {
                node.setEnd();
                return;
            } else if (!node.keys.has(input[0])) {
                node.keys.set(input[0], new Node());
                return this.add(input.substr(1), node.keys.get(input[0]));
            } else {
                return this.add(input.substr(1), node.keys.get(input[0]));
            }
        }
        this.isWord = function (word) {
            let node = this.root;
            while (word.length > 1) {
                if (!node.keys.has(word[0])) {
                    return false;
                } else {
                    node = node.keys.get(word[0]);
                    word = word.substr(1);
                }
            }
            return (node.keys.has(word) && node.keys.get(word).isEnd()) ? true : false;
        }
            this.print = function () {
                let words = new Array();
                let search = function (node = this.root, string) {
                    if (node.keys.size != 0) {
                        for (let letter of node.keys.keys()) {
                            search(node.keys.get(letter), string.concat(letter));
                        }
                        if (node.isEnd()) {
                            words.push(string);
                        }
                    } else {
                        string.length > 0 ? words.push(string) : undefined;
                        return;
                    }
                };
                search(this.root, new String());
                return words.length > 0 ? words : null;
    }
}
8. Граф
Граф, иногда известный как сеть, относится к наборам узлов со связями (или ребрами). Это может быть далее разделено на две группы (то есть ориентированные графы и неориентированные графы), согласно тому, имеют ли связи направление. График широко используется в нашей жизни - для расчета лучшего маршрута в навигационных приложениях или для рекомендованных друзей в социальных сетях, чтобы взять два примера.
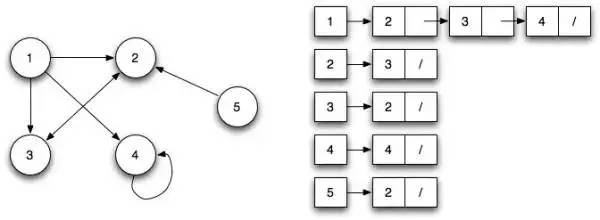
Граф имеет два типа представления:
Список смежности
В этом методе мы перечисляем все возможные узлы слева и показываем связанные узлы справа.
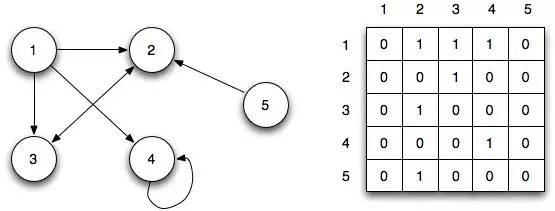
Матрица смежности
Матрица смежности показывает узлы в строке и столбце, пересечения строки и столбца интерпретируют взаимосвязь между узлами, 0 означает, что нет связи, 1 означает, что связано, > 1 означает различный вес.
Для запроса узлов в графе необходимо выполнить поиск по всей древовидной сети с помощью метода Breath-First-Search (BFS) или метода Depth-First-Search (DFS).
Давайте посмотрим пример BFS в Javascript:
function bfs(graph, root) {
  var nodesLen = {};
  for (var i = 0; i < graph.length; i++) {
    nodesLen[i] = Infinity;
  }
  nodesLen[root] = 0;
  var queue = [root];
  var current;
  while (queue.length != 0) {
    current = queue.shift();

    var curConnected = graph[current];
    var neighborIdx = [];
    var idx = curConnected.indexOf(1);
    while (idx != -1) {
      neighborIdx.push(idx);
      idx = curConnected.indexOf(1, idx + 1);
    }
    for (var j = 0; j < neighborIdx.length; j++) {
      if (nodesLen[neighborIdx[j]] == Infinity) {
        nodesLen[neighborIdx[j]] = nodesLen[current] + 1;
        queue.push(neighborIdx[j]);
      }
    }
  }
  return nodesLen;
}
Тестируем:
var graph = [
  [0, 1, 1, 1, 0],
  [0, 0, 1, 0, 0],
  [1, 1, 0, 0, 0],
  [0, 0, 0, 1, 0],
  [0, 1, 0, 0, 0]
];
console.log(bfs(graph, 1));
Результат:
{
  0: 2,
  1: 0,
  2: 1,
  3: 3,
  4: Infinity
}
Вот и все - мы рассмотрели все распространенные структуры данных и привели примеры в JavaScript. Это должно дать вам лучшее представление о том, как структуры данных работают в компьютерах. Удачного кодирования!